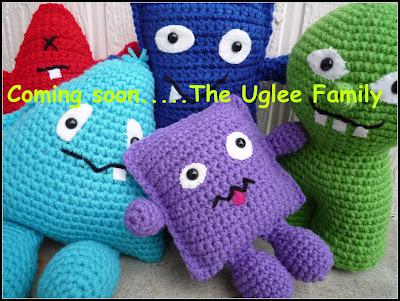
Materials:
WW yarn (color of choice)
G hook
Small amounts of felt (white &red)
9mm safety eyes
White embroidery thread w/ needle
Small amount of black yarn
Polyfill stuffing
Chain 21, turn
Row 1 sc in each chain space across (20 sc) turn; chain 1
Row 2 skip first sc, sc in each sc across row; turn, ch. 1
Row 3-54 repeat row 2.
Do not fasten off.
Fold the long rectangle in half, length-wise.
Working from the corner you’ve just completed slip-stich along the long slide of the rectangle, fasten off.
I work on the facial features now before stuffing and I can easily embroider with my hand inside the “body”.
Eyes:
Since this pattern can fashion more than one particular looking “Uglee” You need to decide how ugly it should be. I choose from a whole host of combinations for eyes.
*2 mis-matched somewhat circular or oblong eyes. ( I use quarters for larger circles and dimes for smaller. I free hand football-shaped eyes.)
*1 funny shaped eye
*A giant X for one or both eyes.
But this is your Uglee so if you think of an eye that matches the personality of yours, go for it!!! (Then please share your finished product, so we can oogle it!)
If I am working on 2 mis-matched circular eyes. I trace the pattern onto the felt. Cut it out, also cut a small notch out of the center of the piece of felt so you can slip the safety eye easily through the felt Attach the safety eye and felt about row 9 on the front of your stuffie. Using white embroidery floss, I fasten the felt with very fine stitches all around the edges of the felt to secure it in place.
Repeat with your second eye.
Mouth:
The same “eye” philosophy applies for deciding the personality of the mouth of your Uglee. I choose from these basic mouth styles:
A “V” shaped smile
A crooked smile
A straight line
I choose to use a WW weight black yarn (RHSS) in a large eye yarn needle and stitch in the mouth.
Teeth/Tongue:
I choose from these basic teeth styles:
1,2, or 3 small square teeth
1 fang
Tongue sticking out
I fashion these the same way I do the background for the eyes. I cut out the desired shape from the felt, place it in the desired location, then stitch around the edges to fasten it securely in place.
Body:
When you have the facial features completed you are now ready to finish slip stitiching the remaining sides of the rectangle leaving a small opening to insert the stuffing. I use the eraser end of a pencil to carefully fill in all the corners. When stuffed to your liking, whip stitch the remaining opening closed.
Legs(make 2):
Legs are made in a continuous spiral. Do not turn. Use a stitch marker to move up after every completed row or count your stitches.
Using the main body color, chain 2.
Row 1 6 sc into second chain from hook (6sc)
Row 2 2sc into every stitch around (12sc)
Row 3 *2 sc into next sc then 1sc in next stitch* repeat all the way around (18sc)
Rows 4-8 sc in every stitch
Row 9 *sc dec in next stitch then sc in neighboring stitch* repeat all the way around (12sc)
Row 10 *sc dec in every stitch around(6sc)
Rows 11 & 12 sc in every stitch around
Fasten off
Stuff lightly
Additional pattern notes:
I use the invisible single crochet decrease. You can find a great tutorial at http://www.planetjune.com/blog/the-ultimate-finish-for-amigurumi
Arms (make 2):
Arms are made in a continuous spiral. Do not turn. Use a stitch marker to move up after every completed row or count your stitches.
Using main body color, chain 2
Row 1 6 sc into second chain from hook (6sc)
Row 2 2sc in every stitch around. (12sc)
Rows 3 1 sc in next stitch, then 2 sc in next stitch; repeat around. (18sc)
Rows 4-5 sc in each stitch,
At the end of row 5, chain 3 and sc into the sc at the bottom of the chain. (forms “thumb”)
Row 6 sc in each sc around
Row 7 sc dec in first stitch then sc in next stitch; repeat around(12sc)
Row 8 sc dec in every stitch. (6sc)
Rows 9-10 sc in every stitch
Fasten off.
Stuff lightly.
Attach arms and legs to desired sides. I just use a simple whip-stitch. I like to place each arm in the center of each long side. I sew then behind the slip stitched seams.
Name your Uglee and enjoy!
Rectangle Uglee

Sketches of possible eye and mouth shapes:


6 comments:
Hi Caroline! I was just mentioning your little Uglees to Dear Daughter today, telling her how cute they were! Thanks for sharing your pattern, and hope you're enjoying your weekend! ~tina
Very cute. :)
i did one of these that was a cat quite some time ago but the little dog I owned managed to get a hold of it. They are very cute.
Love it! Can't wait til the rest of the patterns are out too.
Awwww...he's so ugley, he's cute...lovely pattern! Thanks for sharing. I could even make one out of hemp or twine and crochet one as a toy for my dog - I even have some squeakers to put inside...what a great idea! I think I'll make him one for Christmas :-) Thank you!!!
Doris and Gizzy
CrochetinginGeorgia.blogspot.com
What are the adorable Uglee's sizes?
thanks so much!
Post a Comment